
With the cooler months in the northern hemisphere approaching, our planting habits change - they need to change. Often this means that we retreat to a greenhouse or bring our gardening indoors. Often this also means that we leave our propagating until the warmer months return.
Even in warmer locations, propagating our favourite plants usually require that our seeds, seedlings or cuttings remain warm, and retain adequate moisture. Whether we live in a cool environment, or in a warmer location, a propagation box is a simple and inexpensive solution to providing our new plants-to-be with the best chance of developing into wonderfully healthy new plants.
There are many ways to make your own propagation boxes, but here are some simple ideas:
How to Make Your Own Propagation Box
The basic requirements of a propagation box are that they:
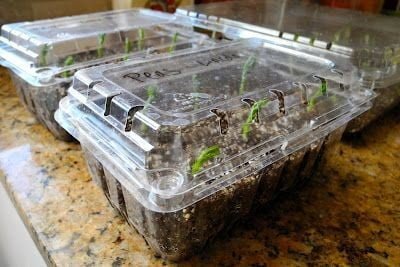
- are mostly clear - or at least have a clear top or lid. This could be either plastic or glass.
- contain a suitable growing medium for the plants/seedlngs.
- receive adequate water.
- have holes in the bottom for drainage.
The only other factor to consider is the size - this will be determined by the type of plants that you intend propagating in the box.
The following steps should be helpful:

Step 1
Identify a suitable container to use as your propagation box. Thrift shops are a good and cheap source of suitable containers. You will probably have many suitable containers in your own home.
Step 2
Drill holes in the bottom of the container. It is important that there is suitable moisture is available (this is why a clear lid is important), but it is also important to ensure that excess moisture is able to drain away.
Step 3
Add your growing medium. This can be made by you using such materials as peat moss, perlite and vermiculite. But you can also use a commercially available seed raising mixture. I would recommend that you don't use a 'normal' potting mixture. However, if you wuld like to use this, it would be a good idea to use a seive to remove the coarser particles first.
Ensure you add a suitable depth to allow good root development prior to transplanting out in to the garden. For seedlings, a good depth would be approximately 25ml (1") or for cuttings in a larger box, 100ml (4") would be a good guide.
Step 4
Add water. Ensure that you add the water carefully and don't cause the soil medium to be moved by this process - pour or spray it carefully. Add enough water to ensure that the soil becomes moist throughout - not wet.
Once you have added the water, place the lid on top and allow the container to sit for 2 or 3 days - this allows any excess water to either evaporate or drain away, while maintaining the moisture level within the soil itself. It also allows the moisture to distribute evenly throughout the available soil.
Step 5
Plant your seeds, seedlings or cuttings. For seeds and seedlings, use the planting guides provided with them. For cuttings, applying some rooting hormone will usually increase the chance of success. In the absence of rooting hormone, dipping the tip of the cutting in honey can also help with promoting the growth of roots. Then, use your finger or the tip of a pencil to bore a hole just large enough for the cutting - this will help ensure that the rooting hormone remains on the cutting during planting.
Place the cutting in the hole and then firm the soil around its base.
Step 6
Put the lid on. I know that this sounds obvious, but it is important - the lid ensures that the moisture is retained in the propagation box. You should monitor it closely to keep an eye on how the moisture levels retained - you may need to consider adding ventilation holes to the lid.
Step 7
Locate the propagation box in a warm location where it also gets lots of light - if you live in a cold climate, you will need to be particularly mindful of this. you may even need to consider some way of adding warmth to underneath the box.
Lastly, ensure you monitor your plants daily and ensure that the moisture levels, warmth and light available are good. When you notice roots growing and the cuttings or seedlings are well established, you can then plant them out into a suitable location of the garden or into a pot.
Some final recommendations are that you consider some of the following:
- A soil moisture guage
- A heat mat if you are in a cold climate
- Some growth hormone for encouraging root growth on cuttings
- A spray bottle for adding water to the box


Get involved!
Comments