
Composting is a natural and sustainable process that transforms kitchen and garden waste into nutrient-rich compost, which is often referred to as "black gold" for its immense benefits to soil health and plant growth. It's a simple yet effective way to reduce waste, recycle organic materials, and create a valuable resource for your garden. In this article, I will walk you through the step-by-step process of making compost.
Step 1: Choose the Right Method
Before you begin composting, it's important to decide on the composting method that best suits your needs and available resources. Here are three popular methods:
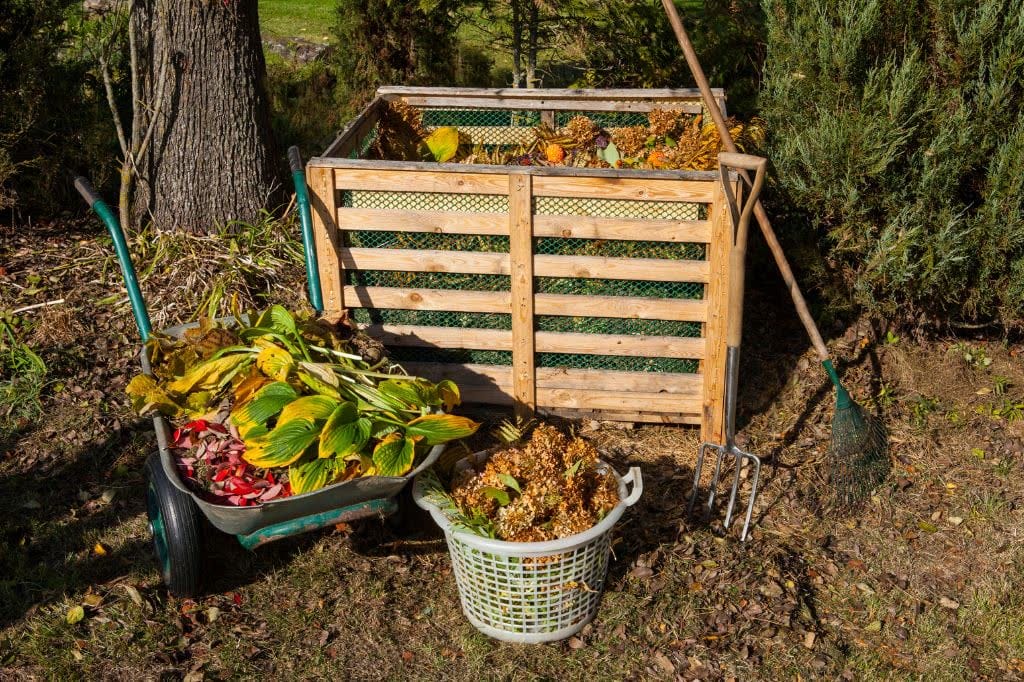
- Traditional Composting: This method involves creating a compost pile or bin in your backyard. Typically, this bin should be about 1 cubic metre in size - not smaller. It requires a balance of organic materials, regular turning, and patience as it takes several months to a year to produce finished compost.
- Vermicomposting: Ideal for smaller spaces like apartments or balconies, vermicomposting utilises worms to break down organic waste. You'll need a specialised worm bin and a supply of red worms (Eisenia fetida or Lumbricus rubellus) to convert your kitchen scraps into nutrient-rich worm castings.
- Hot Composting: This method involves creating a larger compost pile and actively managing the conditions to speed up the decomposition process. It requires a larger space, regular turning, and attention to temperature and moisture levels. Ideally, I would recommend that this pile is at least 2 metres square and about 1 metre high - as large as is practical in the space you have available.
Step 2: Gather Your Materials
To create a successful compost pile, you'll need a mixture of "green" and "brown" materials. Green materials are rich in nitrogen, while brown materials are carbon-rich. The combination of these two types of materials creates a balanced compost that decomposes effectively - while you are building the pile, it is important to maintain this balance. Here are examples of each:

Green materials: Fruit and vegetable scraps, coffee grounds, tea leaves, fresh grass clippings, plant trimmings, and weeds (avoid weeds that have gone to seed).
Brown materials: Dry leaves, straw, shredded newspaper, cardboard, wood chips, sawdust (in moderation), and dried garden waste.
As mentioned, it is important to maintain a balance between green and brown materials to prevent the compost pile from becoming too wet or too dry. Aim for a ratio of roughly three parts brown materials to one part green materials.
Step 3: Prepare the Area
Select a suitable location for your compost pile or bin. Ideally, choose a level, well-drained spot that is easily accessible. Your compost pile moisture level is critical - it must not get too wet. So being located in a position that drains well is very important. If you are using a compost bin, ensure it has adequate ventilation as well.
Step 4: Build the Compost Pile
Start by creating a base layer of brown materials on the composting area. This helps with aeration and drainage. Add a layer of green materials on top, followed by another layer of brown materials. Continue layering the materials until you've used up all your composting ingredients. When starting, having the layers approximately 10 to 20 centimetres thick is a good rule of thumb. Try to keep the pile at least three feet high and three feet wide for effective decomposition.

Step 5: Maintain the Compost Pile
Regular maintenance is essential to keep your compost pile decomposing efficiently. Follow these guidelines:
- Moisture: Keep the compost pile moist, similar to a damp sponge. If it's too dry, the decomposition process will slow down. Water the pile occasionally, especially during dry periods. Conversely, if the pile is too wet, add more brown materials to improve airflow and prevent odour.
- Turning: Every few weeks, use a garden fork or shovel to turn or mix the compost pile. Turning the pile introduces oxygen, aids decomposition, and prevents unpleasant odours. You can also monitor the temperature and moisture levels while turning.
- Size of Materials: Chop or shred larger materials into smaller pieces before adding them to the compost pile. This increases the surface area available for decomposition and speeds up the process.
- Aeration: To enhance airflow, consider adding twigs or sticks to create air pockets within the compost pile. This helps oxygen reach the microorganisms responsible for decomposition.
Step 6: Composting Tips
Here are some additional tips to optimise your composting experience:
- Avoid adding meat, dairy products, oily foods, or pet waste to your compost pile. These materials can attract pests, create unpleasant odours, and may not decompose properly.
- Maintain a good balance between green and brown materials to ensure proper decomposition. If your compost pile smells bad, it may indicate an imbalance. Add more brown materials to restore equilibrium. Remember; healthy compost does not smell bad.
- Consider using a compost thermometer to monitor the temperature of your compost pile, especially for hot composting. Hot composting requires temperatures between 120°F and 160°F (49°C and 71°C) to break down materials effectively.
- Cover the compost pile with a tarp or lid to retain heat and moisture, especially during rainy or colder periods.
Step 7: Time to Harvest
Composting requires time and patience. The process can take anywhere from several months to a year, depending on the composting method, materials used, and the environmental conditions. When the compost is ready, it should resemble dark, crumbly soil with a pleasant earthy smell.

To harvest your compost:
- Stop adding new materials to the pile and allow the remaining materials to finish decomposing.
- Sieve the compost using a mesh screen or hardware cloth to remove any large, undecomposed materials. These can be added back to the compost pile for further decomposition.
- The resulting compost is now ready to use! Spread it over your garden beds, mix it with potting soil for container plants, or create a compost tea by steeping some compost in water and using it as a nutrient-rich liquid fertiliser.
Benefits of Composting:
- Waste Reduction: Composting diverts organic waste from landfills, reducing methane emissions and contributing to a more sustainable environment.
- Soil Enrichment: Compost improves soil structure, increases water retention, and enhances nutrient availability for plants. It also encourages beneficial microbial activity, creating a thriving ecosystem in the soil.
- Plant Health: Adding compost to your garden beds boosts plant growth, strengthens disease resistance, and promotes healthier, more vibrant plants.
- Cost Savings: Composting allows you to create your own nutrient-rich soil supplement, reducing the need for store-bought fertilisers and soil conditioners - compost is a wonderful soil conditioner.
Composting is a valuable gardening practice that enables gardeners to take an active role in reducing waste and nourishing their gardens. By following these steps and incorporating composting into your routine, you can contribute to a more sustainable future while enjoying the benefits of healthier plants and flourishing soil.
Composting FAQs
You can compost:
- Greens: fruit & veggie scraps, coffee grounds, grass clippings.
- Browns: dried leaves, shredded paper, cardboard, straw.
Avoid meat, dairy, oily foods, pet waste, and glossy paper.
It depends on the method:
- Hot composting: 4–6 weeks with frequent turning.
- Cold composting: 6 months to 2 years.
Factors like temperature, moisture, and material balance also affect speed.
For hot composting, turn it every 2–3 days to once a week.
For cold composting, turning every few weeks or months is fine.
Turning helps oxygenate the pile and speeds decomposition.
A sour or rotten smell usually means:
- Too many wet, green materials.
- Poor airflow or excess moisture.
Fix it by adding browns (dry materials) and turning the pile for aeration.
Only if you're doing vermicomposting (worm bins).
Outdoor compost heaps attract native worms naturally.
Don’t add worms to a hot compost pile—they won’t survive the heat.
A lid helps:
- Keep out rain (prevents soggy compost)
- Deter pests
- Retain heat
If your bin is uncovered, use a tarp or make sure it drains well and has good airflow.
Finished compost:
- Looks like dark, crumbly soil
- Smells earthy (not sour)
- Has no visible food scraps
You might still see a few twigs or eggshell bits—that's normal.
Yes - if you add meat, dairy, or don’t bury food scraps properly.
Avoid strong-smelling items, and always cover fresh scraps with browns to deter pests like rodents or flies.


Get involved!
Comments